Ok so, just having started using my Autovic and having not done any letterpress since uni and my memory of it being more about typesetting than setting up the machine, I have been picking the brains of anyone I can and looking all over the internet for advice. To be honest my Autovic is pretty simple to use once you’ve set it up and it’s more a matter of confidence which comes with practice. I am really happy with the results of my printing. I had, however never used a creasing rule, so after successfully setting it up and using it I thought I would share a little ‘how to…’ for anyone else out there who is new to using this.
Ok so the way I did this was to lock up the creasing rule vertically in the chase. Then to ink the edge of the creasing rule with a hand roller. Close the press up with impression on so you get a print on the tympan to help you line up where you want the creasing line. If this is in the right position clean the rule and then slide on your creasing matrix. Peel the sticky plastic tape backing off the back, close the press with the impression on and then open again. Now the matrix is stuck to the tympan and you can peel the top piece of plastic off so you are left with just the matrix channel.
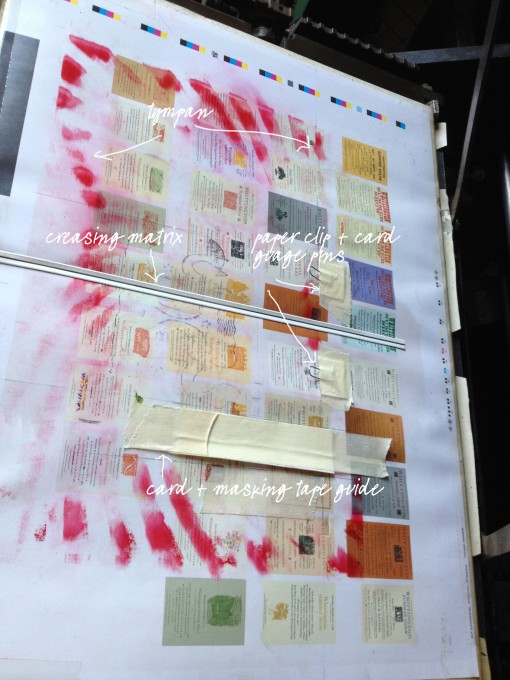
You can see in the image below the matrix channel stuck on the tympan. As I don’t have gauge pins and use a lay gauge, I couldn’t use it with the creasing rule so made my own pins by cutting the ends off 2 paperclips and attaching them to some card and securing them in place with masking tape. I then lined my paper up with these and the rule, and used a piece of card and masking tape to make a side guide.
So ready to go, just pop your paper in close it with the impression on and voila perfectly creased paper.
The finished article! I hope this helps anyone who like me was just a bit unsure of how to do this.


